 Press
the first Select button and select the VIDEO_TS folder where you ripped the
DVD files into.
Press
the first Select button and select the VIDEO_TS folder where you ripped the
DVD files into.DVD2one Guide
DVD2one was the first in a series of new DVD backup programs based on compressed domain transcoding. This technique, developed for real-time transcoding of movies to be broadcast, can reduce the size of an MPEG-2 stream at very high speeds. DVD2one was designed to be simple yet efficient, thus you won't find many snazzy features and selections, but it'll do the job using very little time.
You'll need the following software for this guide
DVD2one
DVD Decrypter or
an on-the-fly decryption driver like AnyDVD
or DVD Region-Free
ImgTool &
DVD Decrypter
or a commercial DVD burning program
Table of content
1: Ripping the DVD
2: Transcoding
3: Burning
DVD2one can only process unencrypted DVDs. Thus you must first rip the DVD to your harddisk. If you're using AnyDVD or DVD Region-Free you do not have to perform this step.
Once you have ripped the DVD, it's time for DVD2one to enter the scene. The first thing you'll be greeted with upon startup is a small screen where you press the Start Program button. Note that if you're using the trial version not the whole movie will be processed. The next step is selecting a language for the program (DVD2one has been translated to many languages), a default font size, the start screen (set this to Directory Screen for the quickest startup) and pressing Next to proceed.
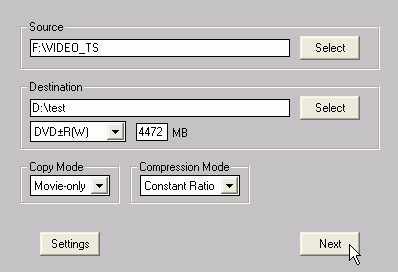
 Press
the first Select button and select the VIDEO_TS folder where you ripped the
DVD files into.
Then press the 2nd Select button to select the path where DVD2one will put the processed files.
If for some reason you prefer to not fill up the entire DVD you can change the default output size using two custom size entries (you can access them using the dropdown list where currently DVD±R(W) is selected).
Then set the Copy mode. Movie-only will process only the main movie and discard extras and menus. Full disk will process everything and allow you to keep all the extras and menus present on the DVD. Join mode allows you to put multiple DVDs on one DVD±R or to join a flipper movie (a movie split over two sides of a DVD).
Last but not least, set the Compression Mode to Constant Ratio. Constant Ratio will simply reduce the bitrate proportional to the original bitrate and generally works a bit better for longer movies than Variable Ratio.
Then press Next to proceed.
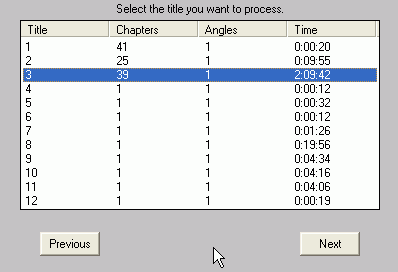 The
next step is selecting the appropriate movie item on the disc. The number of
chapters and the time should help you identify the main movie, normally the
title having the longest play time is the main movie.
Some time, you'll have multiple titles having the same time, in this case select the first one. In case you have several titles having a similar length you may be dealing with a seamless branching movie. For instance, the R1 edition of Independence Day, The Abyss and Terminator 2 Ultimate Edition, contain several versions of the movie on the same disc. The shortest version is the regular theatrical cut (i.e. what you saw in the movie theater), the longer version is the director's cut.
Press Next to get to the language and subtitle selection:
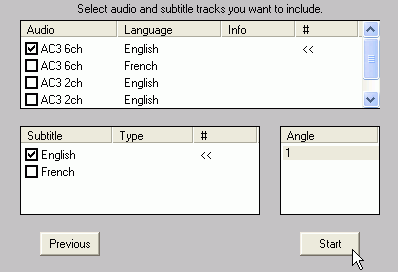 In
this screen all available audio and subtitle streams will be shown. In case
you have a multiangle disc, you can also select the appropriate angle (as a
rule of thumb, angle 1 is usually the "normal" version, i.e. without
sketches overlayed, without foreign language beginning and end credits, etc.).
In the audio section the number of channel and the language is shown. Check the streams you want to keep, the rest is discarded. The same also applies for the subtitles.
To set a language as default for future projects, double click on the appropriate audio / subtitle stream so that a << sign is shown in the # column.
Then you can press Start to start the encoding process.
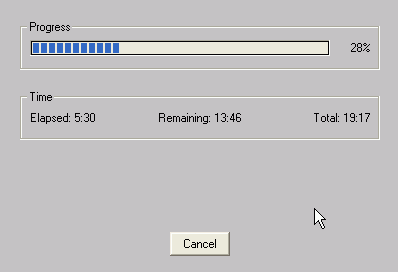
DVD2one will keep you informed of the progress and you can use the remaining
time indicator to schedule your coffee break ;)
Once you're done DVD2one will show you a small message. You are now ready for
burning.
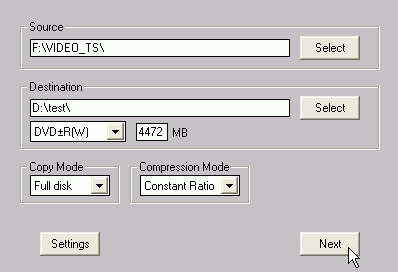 When
doing a full movie back you have to set copy mode to full disk as shown on the
left. Then press Next to proceed.
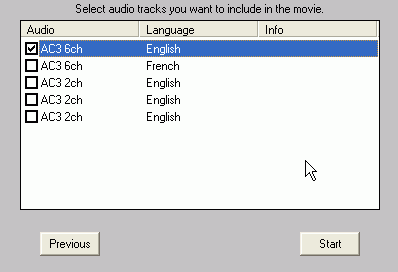 In
full disk mode all extras will be kept, including all available audio and subtitle
streams.
The selection shown here applies to the main movie. Only check the audio streams you really need, the others will be discarded, thus freeing up some additional space for the video.
Press start to begin processing.
 DVD2one
will keep you informed of the progress and you can use the remaining time indicator
to schedule your coffee break ;)
Once you're done DVD2one will show you a small message. You are now ready for
burning.
Join mode
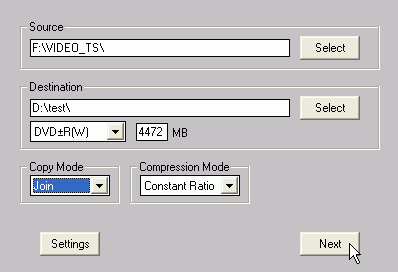
DVD2One's join mode allows you to put a flipper disc onto a single DVD±R or put multiple Episodes or movies onto a single disc. To get started in join mode, just set the Copy Mode to Join, select source and destination of the first movie for your project, then press Next.
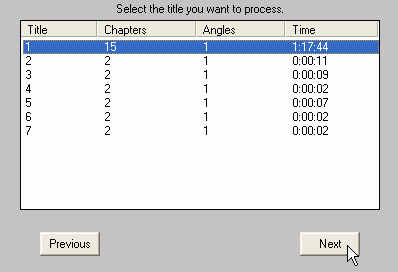 The
next step is selecting the appropriate movie item on the disc. The number of
chapters and the time should help you identify the main movie, normally the
title having the longest play time is the main movie.
Some time, you'll have multiple titles having the same time, in this case select the first one. In case you have several titles having a similar length you may be dealing with a seamless branching movie. For instance, the R1 edition of Independence Day, The Abyss and Terminator 2 Ultimate Edition, contain several versions of the movie on the same disc. The shortest version is the regular theatrical cut (i.e. what you saw in the movie theater), the longer version is the director's cut.
Press Next to get to the language and subtitle selection:
 In
this screen all available audio and subtitle streams will be shown. In case
you have a multiangle disc, you can also select the appropriate angle (as a
rule of thumb, angle 1 is usually the "normal" version, i.e. without
sketches overlayed, without foreign language beginning and end credits, etc.).
In the audio section the number of channel and the language is shown. Check the streams you want to keep, the rest is discarded. The same also applies for the subtitles.
To set a language as default for future projects, double click on the appropriate audio / subtitle stream so that a << sign is shown in the # column.
Then you can press Next.
 DVD2One
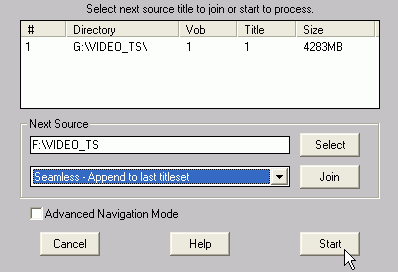
will now show an overview of your currently added titles. Configure the Next
Source path to point to where the next movie item resides. All movie items must
be available at all times, so you either need two DVD drives (if joining two
movies), or you have to rip one movie and
mount it as virtual DVD drive.
Then set the join mode. Seamless - Append to last titleset will seamlessly join the titles if possible. Select this option when joining a flipper. In seamless mode, the 2nd title will start playing immediately after the first one. If you're putting multiple movies into the same disc, you might want to select Non seamless - Put in next titleset instead. Using your DVD player's facilities, you can then select which movie to play once you've entered the disc. If you're using the non-seamless mode, the Advanced Navigation Mode can be useful. Checking this option will create a basic navigation feature that should work regardless of your player's facilities to switch between titlesets. Using it enables you to use the right and left menu button to switch between titlesets, and pressing next chapter at the end of the first title will go to the first chapter of the second title, and vice versa.
Once you've selected the join mode and the path of the next source, press Join
to add the 2nd source. You'll have to go through the audio and subtitle selection
again unless you've chosen the seamless mode. You'll then get back to the overview
screen:
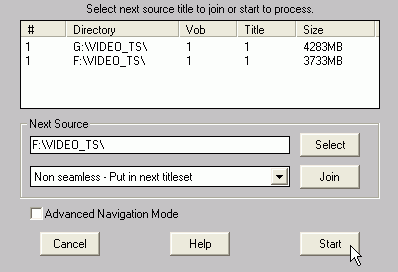 Having
added the two sides of the flipper disc, you can now press Start to start the
encoding process.
 DVD2one
will keep you informed of the progress and you can use the remaining time indicator
to schedule your coffee break ;)
DVD2one
will keep you informed of the progress and you can use the remaining time indicator
to schedule your coffee break ;)This document was last updated on April 12, 2009