 You
should import your assets to the Video & Audio part of the assets. Backgrounds
contain frequently used image files to be used as background for menus. Objects
are images, buttons and other graphical objects.
You
should import your assets to the Video & Audio part of the assets. Backgrounds
contain frequently used image files to be used as background for menus. Objects
are images, buttons and other graphical objects.DVD-lab Guide
If you're unhappy with the often feature limited or crippled DVD authoring tools that ship with your DVD burner, and are looking for a cheap solution to author DVDs that contain more than just a movie with chapters (those you can get for free on this very site), you might have heard about DVD-lab. It's part of the sub $100 DVD authoring packages, but considering the pricetag, its featureset is quite amazing. It doesn't support multiple audio tracks and subtitles, but other than that it's quite complete. Unlike other tools in that pricerange, complex navigation, motion menus with audio, 6ch AC3 or DTS audio are no problem for DVD-lab, and it even includes a built-in menu transition builder, and wizards to create animated menus and chapter selection menus like you can find them on commercial DVDs. And if you're looking for a professional level solution, DVD-lab Pro is about to be released (and considering its features and pricetag its simply a steal).
You'll need the following software for this guide
DVD-lab
MPEG-2 video encoder: CCE,
TMPG, ProCoder,
QuEnc
Properly encoded source material for your DVD
Step 1: Preparing the sources
That's the step that makes me not want to write DVD authoring guides. Source preparation is going to take you longer than the whole rest of the process. And if you want fancy menus, you should prepare a few fancy backgrounds, or videos for your menus. I don't feel very artistic so I usually create rather ugly looking menus without a lot of bells and whistles (as you'll be able to see, I bet you'll create much nicer menus after reading this guide). I've set out the create the following project: I captured a movie using my DVB-S card, and since there was space left (but not quite enough for a 2nd movie), I've added an episode of Smallville. Since my source is MPEG-2 compressed, there was no reason to recompress it, I just had to cut out commercials. My DVD is to contain a "movie" selection menu without any bells and whistles (static background, no music), then a menu for each movie using a background from publicly available image sources that you can find on the Internet (poster sites come in handy here), and finally animated chapter selection menus. I also got an audio background for the Smallville menu, I simply cut out the audio during the credits which contains the theme.
Your video sources must all be DVD compatible and be of the same format (you can't mix PAL and NTSC content on a DVD). DVD-lab does not contain an MPEG-2 encoder (well, it does but it's not directly accessible), so you'll have to encode your video sources if they don't have the proper format (or are too large, HDTV content comes to mind). Audio can be MP2, WAV/PCM (it is suggested that you compress such sources to MP2 to save space) or AC3 (note that for NTSC projects, MP2 is not officially supported in the DVD standard), and the sampling rate must be 48 kHz.
Step 2: Movies
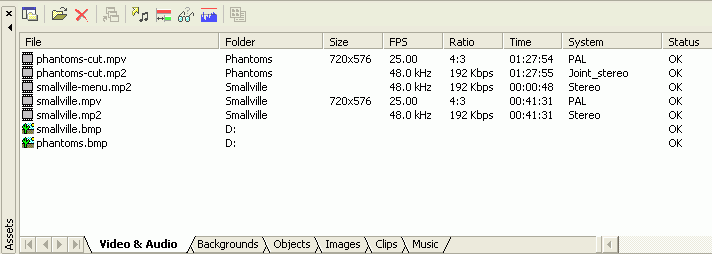
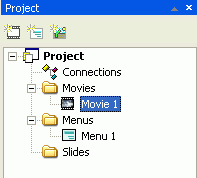
Having assembled your sources, let's get down to business with DVD-lab. Once you start up DVD-lab, you'll note that the main window is divided into three parts: On the left you have the various elements of your project: Connections (that's what defines the navigation between content elements), Movies (video content), Menus and Slides (slideshows). At the bottom of the window, you'll have your assets. All audio, video and image files are assets. To the right of the assets, you have a preview window to preview assets. The main part of the window is used to create and edit project elements.
To get started, you have to import all your assets. You can simply drag and drop all your files into the assets window.
You
should import your assets to the Video & Audio part of the assets. Backgrounds
contain frequently used image files to be used as background for menus. Objects
are images, buttons and other graphical objects.
Images are video stills, Clips contain video clips, and Music contains music files.
If you're using an asset in multiple projects, consider importing it to another folder than Video & Audio (that one is used only for the current project).
You can now click on an asset and preview it in the preview folder.
It is possible to import multiplexed assets, rather than separate audio and video files as shown above. In that case, DVD-lab will ask you to demultiplex the file. It is generally a good idea to start with elementary streams (meaning separate audio and video), so let DVD-lab demultiplex any multiplexed sources you might have. If you import an MPEG audio file that is not specs compatible, DVD-lab will propose to transcode it to the proper format, which is also a good idea (alternatively transcode it to the proper format using a tool like BeSweet).
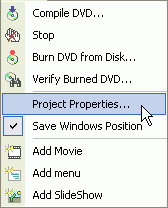
Before you proceed, it's a good idea to configure the global project options. To do this, select Project - Project Properties:
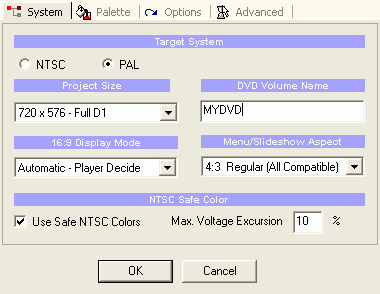 In
the System tab, set the TV format for your project and the Project
Size (the resolution). You can also already configure the disc name and
the aspect ratio for menus. Note that if you select 16:9 menus, the disc menus
will look squeezed on 4:3 TVs and the buttons will be out of place.
In
the System tab, set the TV format for your project and the Project
Size (the resolution). You can also already configure the disc name and
the aspect ratio for menus. Note that if you select 16:9 menus, the disc menus
will look squeezed on 4:3 TVs and the buttons will be out of place.
In the Palette tab, you can configure a global color palette for your project. A project can have 16 colors, which you can configure right here.
Press OK to save those changes.
Having imported your assets, the first thing to do is create movies. Movie elements in your project contain the actual video. Note that an animated menu is not a movie, even though it contains video. Double click on Movie 1 in the project window to bring up a window in the main part of DVD-lab where you can configure the movie.
Drag and drop your first movie file from the assets window to the initially empty movie window. Then do the same with the audio file.
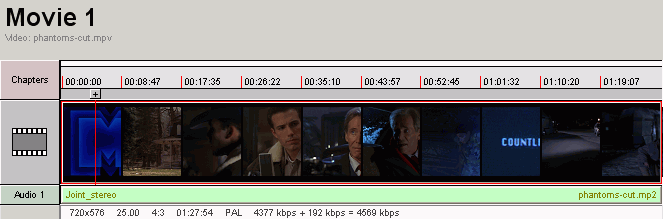 Note
how DVD-lab shows a number of thumbnails from the video, a timeline above the
video and the audio track below the video thumbnails. Using your mouse, you
can move around the video. The red vertical line over the thumbnails represents
the actual position in the movie, you can move it using your mouse. The actual
frame will always be shown in the preview window, including the actual position.
Note
how DVD-lab shows a number of thumbnails from the video, a timeline above the
video and the audio track below the video thumbnails. Using your mouse, you
can move around the video. The red vertical line over the thumbnails represents
the actual position in the movie, you can move it using your mouse. The actual
frame will always be shown in the preview window, including the actual position.
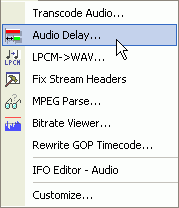
If for some reason audio and video should not match up, DVD-lab can correct audio delays. To do this, select Tools - Audio Delay...
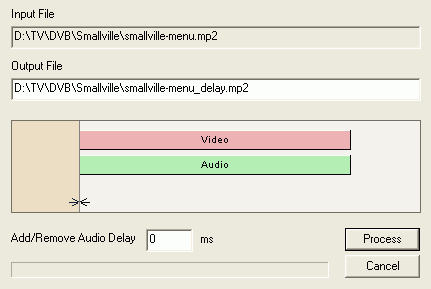 All
you have to do is enter the desired delay value in the Add/Remove Audio Delay
field, and press Process. DVD-lab will graphically show the effect of your entered
delay value (it can be negative or positive). If you're using this function,
make sure you use the proper mp2 audio file and add it to your movie track.
All
you have to do is enter the desired delay value in the Add/Remove Audio Delay
field, and press Process. DVD-lab will graphically show the effect of your entered
delay value (it can be negative or positive). If you're using this function,
make sure you use the proper mp2 audio file and add it to your movie track.
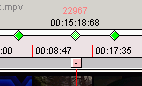
Back to our first movie, it is time to set some chapter points. To create a
chapter point, you have to move the position marker to the appropriate point,
then press on the + sign to create a chapter point. If you like, you can use
the zoom buttons to zoom into the movie timeline to have more control over the
position of your chapter point.
![]()
You can also use the left and right arrow buttons to move around the movie.
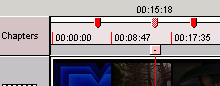 Here
are three chapter points. The middle one has been selected (hence the different
color), and its position timestamp is shown as well.
Here
are three chapter points. The middle one has been selected (hence the different
color), and its position timestamp is shown as well.
To delete a chapter point, just click on the red marker and press the delete button on your keyboard.
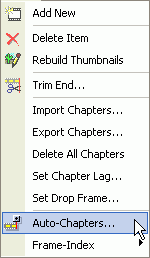
Another option to set chapters is the audiochapters function. To access it,
select Movie - Auto Chapters...
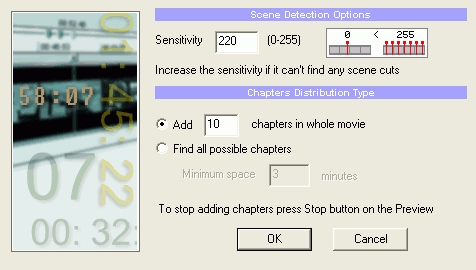 Auto
chapters works via scene detection. DVD-lab will scan the movie for scene changes,
and create chapters at those positions. The Sensitivity parameter can
be used to set how sensitive DVD-lab is to scene changes. The higher the number,
the more chapters will be created.
Auto
chapters works via scene detection. DVD-lab will scan the movie for scene changes,
and create chapters at those positions. The Sensitivity parameter can
be used to set how sensitive DVD-lab is to scene changes. The higher the number,
the more chapters will be created.
You can use the Add X chapters in whole movie to control how many chapters are going to be added in total. Alternatively, you can check Find all possible chapters, and then enter the Minimum space in minutes (that controls the minimum distance two chapters must have from each other).
Press OK to get started, and you can abort the process at any time pressing the Stop button.
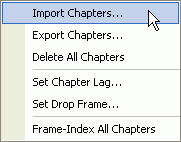
There is yet another option: DVD-lab supports multiple chapter list format.
So, if you have a chapter list for somewhere, you can import it into DVD-lab
by right clicking in the movie window, and selecting Import Chapters...
There are two more options concerning chapters. The first is chapter Lag. As you might know, chapters must start with an I-frame. The frame you've chosen for your start position might not necessarily be an I-frame, thus the chapter won't start at the exact position you've chosen. It might be that your chapter starts too early because DVD-lab picks the closest I-frame to your chosen position. Now, rather than to try and move the chapter position, you can set a chapter lag, for one or all chapters. Chapter lag allows you to adjust the actual chapter position and advance it by ±1 second, be going to the right click menu as before, then selecting Set Chapter Lag...
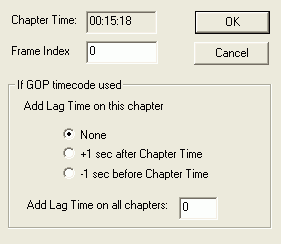
Last but not least we have the Frame_index All Chapters function. DVD-lab can index your video file to get more accurate chapter positions. Without indexing, chapter positions are accurate to up to 0.5 seconds, with indexing, the accuracy is improved by a factor of two, thus to maximum 0.25 seconds different to the actual position you've set in the movie editor. Indexing will take a while, and after it is done, your chapter positions will now be shown as green diamonds. In addition, your video asset will have a green diamond in the logo as well.
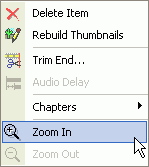
If during asset import you find that your project is too large, you might want to trim the credits of a movie. To do that, you don't have to cut the video using an external cutter. DVD-lab already includes this functionality. Just move the slider to the position where you want the cut to start, then right click and select Trim End...
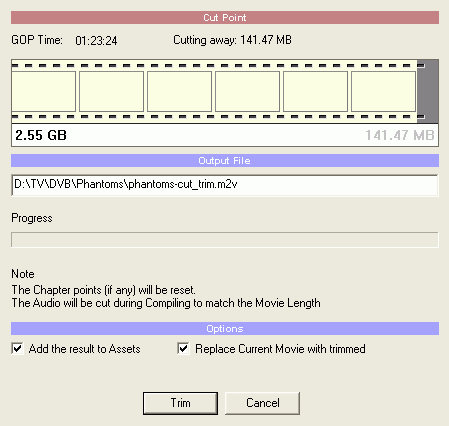 DVD-lab
will show you a graphical preview of the cut, and you can select a name for
the trimmed file.
DVD-lab
will show you a graphical preview of the cut, and you can select a name for
the trimmed file.
Also check Add the result to Assets and Replace Current Movie with trimmed, so that you won't accidentally forget to replace the untrimmed movie with the trimmed one.
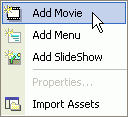
Having set up the first movie, let's add another movie. Right click in the project area, and select Add Movie.
Then double click on the new movie item and repeat the procedure described above to add video and audio, and set chapters.
Step 3: Menus
Having set up the video, it's now time to create a few menus. To create a menu, double click on a Menu listed in the project window. This brings up the menu editor:
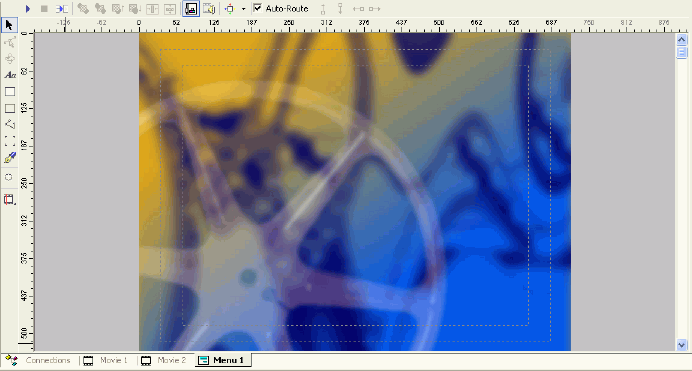 Initially,
the window is black, and the two dotted rectangles you see represent usable
areas on screen. TVs actually don't show you the entire picture, so the area
outside of the innermost rectangular area might not be displayed (this is no
problem on PCs), so place all important elements in that area.
Initially,
the window is black, and the two dotted rectangles you see represent usable
areas on screen. TVs actually don't show you the entire picture, so the area
outside of the innermost rectangular area might not be displayed (this is no
problem on PCs), so place all important elements in that area.
As you can see, there are various design tools to the right and top of the work area, and below you can switch between your movies and menus. You'll also note a coordinate system relative to your screen area which can help you position elements.
As when working with movies, you can use the zoom buttons to enlarge or shrink the menu view.
To help you position elements, you can create horizontal and vertical guidelines, that are lines that show up during authoring, but won't be visible in your final project. To create a guideline, just click in the area with the coordinate system, and drag and drop to the menu are. This creates a dotted, yellowish guideline. If you right-click on a ruler, you can configure your existing guidelines and position them pixel-accurate. To delete a guideline, drag and drop it back to the coordinate area.
In the top menubar, you can configure how DVD-lab helps you align menu elements.
By default, it aligns to guidelines:
![]()
Click the other button shown above, to enable the snap-to-grid mode. DVD-lab will now show an additional grid in the menu area, helping you to align objects.
In order to set up a background, drag and drop one of your image assets, or backgrounds to the menu area. You can also use a frame from one of your video assets: make the video visible in the preview window, go to the appropriate position in the video, then press the Shift key, and while pressing it, drag and drop from the preview area to the menu area. This will set the currently shown video frame as your menu background image.
![]() You
have a variety of tools at your disposal to make your menus more interesting
as shown on the left. The Aa button allows you to create a text area and write
some text on top of the background. This can be used to create simple button
links. Then you can create filled rectangles, non-filled rectangles or polygon
objects. The next button allows you to group elements together (we'll get back
to that). If you have DVD Menu Studio or Real-DRAW Pro (both products from the
makers of DVD-lab) installed, you can import vector objects from those tools
using the 3rd button from the button.
You
have a variety of tools at your disposal to make your menus more interesting
as shown on the left. The Aa button allows you to create a text area and write
some text on top of the background. This can be used to create simple button
links. Then you can create filled rectangles, non-filled rectangles or polygon
objects. The next button allows you to group elements together (we'll get back
to that). If you have DVD Menu Studio or Real-DRAW Pro (both products from the
makers of DVD-lab) installed, you can import vector objects from those tools
using the 3rd button from the button.
Finally, the lensflare button allows you to create a lensflare effect:
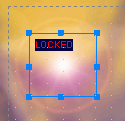 Unlike
other elements, note the LOCKED text in the lensflare area. This means you cannot
move the position of this element, or change its size.
Unlike
other elements, note the LOCKED text in the lensflare area. This means you cannot
move the position of this element, or change its size.
The last button allows you to insert a frame from one of your movies. Note that the first two tools are only active if the proper object is selected. The first one allows you to edit a polygon object, the 2nd one allows 3d rotation of any object. Just select an object, then click on that button and you can move the object using your mouse (don't be afraid to try, you'll get the hang of it).
Okay, let's add some text so that we can select one of the two movies. Click on the Aa button, then draw an area on the menu background.
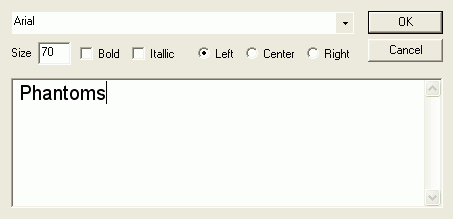 Here
you can select a few basic font properties just like you would in a word processing
software.
Here
you can select a few basic font properties just like you would in a word processing
software.
Having written and positioned the text for our selection, let's configure how
the selection buttons will act. To do that, we use the Color properties to the
right of the menu area:
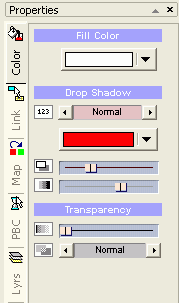 Fill
Color is the color of the element you're adding. To create blue text, just set
the fill color to blue, then create a text item.
Fill
Color is the color of the element you're adding. To create blue text, just set
the fill color to blue, then create a text item.
By default, each item has a shadow. You can change the intensity of the shadow using the Drop Shadow controls, as well as its color. In our example, I've created a red shadow of normal size. The next two sliders are used to control the position of the shadow (distance between the actual text and the shadow) and its intensity. Finally, you can merge text and background using the Transparency options. The slider controls the transparency (left means opaque, the more to the right you move it the more transparent the element becomes) and the selection allows you to control how the transparency effect is applied.
The Map options are also very interesting:
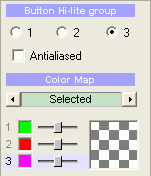 You
can have up to three group of colors (so you could create menus having different
colors when they're active). If you select antialiased, DVD-lab will use all
three groups together and create antialiased (objects having smoother edges)
edges.
You
can have up to three group of colors (so you could create menus having different
colors when they're active). If you select antialiased, DVD-lab will use all
three groups together and create antialiased (objects having smoother edges)
edges.
A button can have 3 states: Normal, Selected and Activated (just like in a webbrowser, normal is a normal hyperlink, selected means you're hovering over the link with your mouse - on this page the color of the link will slightly change - and activated means you've clicked on the link). As buttons use color 3 by default, you should only move the 3rd slider to achieve whatever effect you desire. As you can see, by default, selected buttons are pink.
When working with menu backgrounds it can be quite difficult to select an element.
That's where the Layers menu (Lyrs) comes in handy:
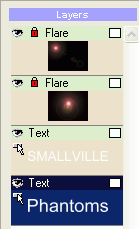 All
elements on the menu page are shown, and clicking on one will select it in the
preview area.
All
elements on the menu page are shown, and clicking on one will select it in the
preview area.
As you can put multiple objects on top of each other, the 4 layer buttons also
come in handy. They'll allow you to bring an object to the front, push it back,
and bring change its layer:
![]()
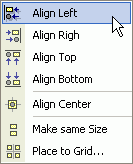
The last two buttons shown above also allow you to align objects. For more alignment options, select Menu - Align:
With that in mind I think you're ready to create any kind of basic menu. But DVD-lab doesn't stop here. In the Menu menu, you'll find the Effects submenu which has some interesting entries:
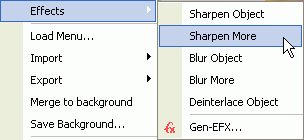 I
won't go into detail here but feel free to experiment with those functions.
I
won't go into detail here but feel free to experiment with those functions.
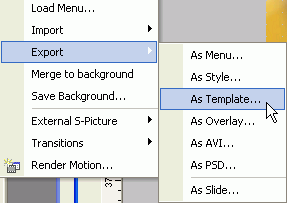
If you've created a nice looking menu that you might want to use for later on,
the Export menu might come in handy.
 Here
you can export a menu in a format that Mediachance's menu creator can process.
Alternatively, you can export a menu as a template and add it to DVD-lab. Similarly,
you can import menus using the import menu and load an exported menu using the
Load Menu... function
Here
you can export a menu in a format that Mediachance's menu creator can process.
Alternatively, you can export a menu as a template and add it to DVD-lab. Similarly,
you can import menus using the import menu and load an exported menu using the
Load Menu... function
Merge to background will merge all menu items you have added to the background (thus removing any button programming).
External S-Picture allows you to import a subtitle overlay image defining the buttons. You'd then have to create buttons using the group hotspot feature (draw a hotspot around the area that you want a button to be, then link it as any regular button).
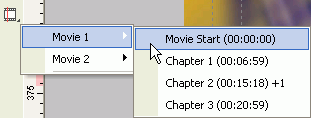
Here is my 2nd menu. Now let's link one of those buttons to an
To link a button to another menu page, or a position in the movie, select the button, right click and select the appropriate element from the menu. Shown below is how I linked the play movie button:
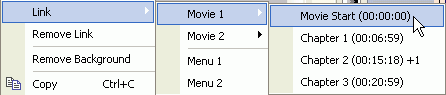
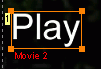
A linked button will be shown with a orange rectangle around it, and the name of the item it links to just below in red. In addition, all linked buttons get a number (shown in yellow). The number indicates how the buttons can be navigated (you'll jump from button 1 to button 2 to button 3 etc.).
Something rather essential is the First Button. On each page, one button has to be selected by default: the first button. You can set a button to be the first button by selecting it, then right clicking in the preview area and selecting Set as First Button.

Besides the colors, there's yet another button property you can configure. Click on the Link tab in the properties to access it:
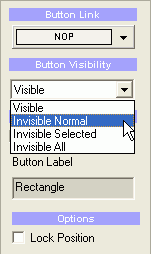 If
the selected button had a link defined, the dropdown list would not show a NOP
(NOP means the button isn't linked). Alternatively to the right click menu,
you could select a button and assign a link to it using this menu.
If
the selected button had a link defined, the dropdown list would not show a NOP
(NOP means the button isn't linked). Alternatively to the right click menu,
you could select a button and assign a link to it using this menu.
Button Visibility is interesting. You could define buttons that are invisible by default, but become visible if they are selected. A good example of that is text underlines that are often used on commercial DVDs. To create a text underline, draw a rectangle below a text item, then set its visibility to Invisible Normal so that it will only become visible when selected. Invisible Selected means the element would be invisible when selected, and Invisible All creates an item that is always invisible (but can still be selected - that's how you create hidden extras ;).
Finally, if you want to prevent accidental moving of the button, check Lock Position.
In the PBC options, you can configure even more:
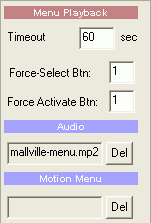 Every
menu can have a Timeout. This means that after a certain amount of time, an
action automatically happens. You might have noted that many commercial DVDs
start playing the main movie without you doing anything - all you have to do
is wait for a minute or so. If you set a timeout, you can create the same effect.
Every
menu can have a Timeout. This means that after a certain amount of time, an
action automatically happens. You might have noted that many commercial DVDs
start playing the main movie without you doing anything - all you have to do
is wait for a minute or so. If you set a timeout, you can create the same effect.
Force-Select Btn: selects the button that is active by default (this is where you use the numbers assigned to buttons when you link them), and Force Activate Btn: is the button that is activated after the menu time-outs.
If you want to add an audio track to the menu, you can simply drag & drop it from the assets to the menu window. And in here, you could delete it again. The same goes for a video background. If you've added a background audio / video, the following two tracks are shown below the menu preview:
 Clicking
on the x will also remove the track.
Clicking
on the x will also remove the track.
Now there's one last thing to be done: Be default DVD-lab auto routes the buttons.
Every menu needs programming that tells the player how the user can get from
one button to the next. By default, Auto-Route is selected, and it creates useful
navigation (when buttons are ordered vertically, you can use the up and down
buttons to navigate, when buttons are ordered horizontally, you can use the
left and right buttons to switch between them). If you prefer to link buttons
on your own, uncheck this option, and the 4 link buttons become active.
![]()
In order to link buttons on your own, you'll first have to make the links visible. You do this by clicking on the navigation button, then selecting one of the options:
 Show
from Selected Object only shows the links from the currently selected menu item,
or you can show them for all items on a menu page.
Show
from Selected Object only shows the links from the currently selected menu item,
or you can show them for all items on a menu page.
Here's an example how one of my menus was automatically linked by DVD-lab:
 Links
using the up button are red, down is green, left would be blue and right would
be yellow.
Links
using the up button are red, down is green, left would be blue and right would
be yellow.
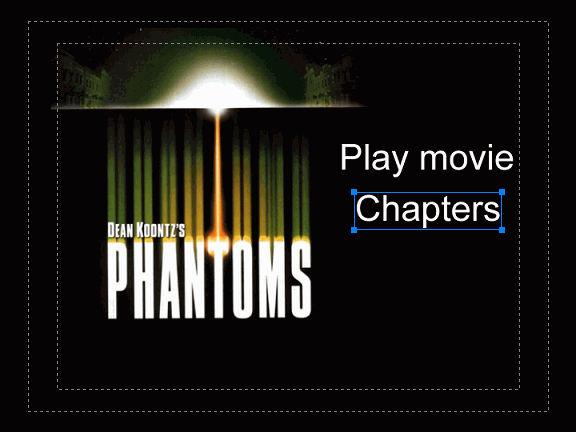
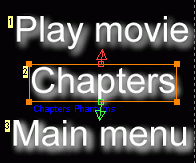
Last but not least, the group hotspot feature. Look at the following image containing
a regular text button, and a rectangular area that is set to be invisible by
default.
 Then
you can group those two items together by drawing a group hotspot area around
them (the currently active area). Now, if the button is selected, both elements
become active in the color that you have selected. While not selected, Chapters
is not underlined but still visible. When selected, Chapters will be underlined.
Then
you can group those two items together by drawing a group hotspot area around
them (the currently active area). Now, if the button is selected, both elements
become active in the color that you have selected. While not selected, Chapters
is not underlined but still visible. When selected, Chapters will be underlined.
Now you are perfectly capable to create a complex menu system. At some point you'll want to verify if your menus really work. That's where the simulator comes in. On top of every menu page, you have three buttons. A blue one with a play sign, a red one (currently gray as it's inactive) to stop the simulation, and finally one to activate menu links. You can start the simulation pressing the play button. DVD-lab will then show you the regular navigational buttons you have on your DVD player remote:
![]()
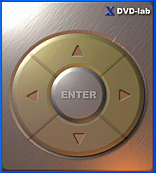
By default, the simulator only works for one page and links are not active. However, if you press the Follow Links button, you can jump in between menus.
Now it's perhaps time to have a look at the navigation programming overview. Double click on Connections in the project window:
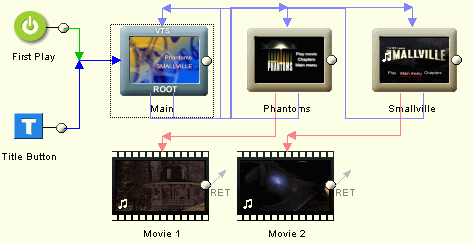 As
you can see, the disc starts out with the root menu, where you get to choose
from my two movies. Then there's one main menu for each movie, with the Smallville
one having an audio track. Both movie menus allow you to play the movie.
As
you can see, the disc starts out with the root menu, where you get to choose
from my two movies. Then there's one main menu for each movie, with the Smallville
one having an audio track. Both movie menus allow you to play the movie.
As it is now, playing a movie is a dead end. The user has to press the Title button to get back to the main menu and there's no automatic return to a menu after the movie has played. We'll change that in a bit.
Wouldn't it be nice to have some kind of motion transition between the menus?
DVD-lab has a bunch of built-in templates to achieve this. To get to these templates,
press the wizard wand button, then select Menu Transition...
![]()
Then you can select the effect and the menus affected.
![]() This
example shows how a transition between the main menu and the main menu for the
movie Phantoms is achieved.
This
example shows how a transition between the main menu and the main menu for the
movie Phantoms is achieved.
There are 38 different transition templates, and you can additional determine the speed of the transition using the Hold A, Transition and Hold B parameters. Hold A indicates how long the original menu is shown before the transition starts, Transition indicates the length of the transition effect, and Hold B indicates how long the new menu is shown in the transition, before the player actually switches to the menu page.
When you press Proceed, DVD-lab will encode the transition, import the movie asset and automatically create the proper links if a link between the From and To menu already exists.
If you go back to the connections, you'll see a circle symbol in the link from
the main menu to the movie menus.
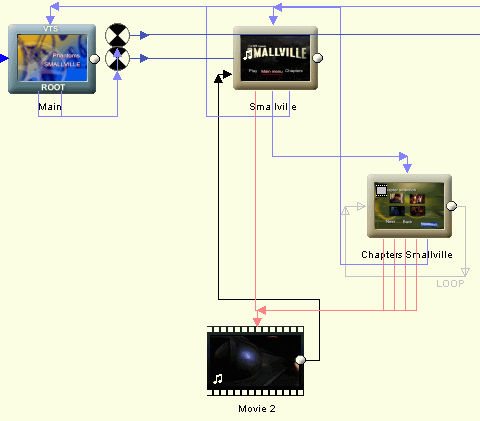 As
you can see, the chapter menu is already there, but pay no attention to this,
we'll create that shortly.
As
you can see, the chapter menu is already there, but pay no attention to this,
we'll create that shortly.
Also note how the movie now has a link (the black one) back to the menu. You can create such a link by selecting the Draw Links button, then drag and drop from the circle on the right side of the movie to the menu page.
![]()
In case you did not have a menu link defined when creating the transition video,
you'll have to insert a blank menu page, add the drag and drop the transition
video item to the menu, link the menu button in the start menu to go to the
transition menu, and create an end of play link to the motion menu to go to
the menu page you want the transition to lead to, using the same mechanism as
when linking from the movie back to the menu.
If you change your menus, the transition menus become outdated. To save you some work, you can simply right click on the transition symbol and select Rebuild Transition.
![]()
To finalize our menus, let's create a nice animated chapter selection menu:
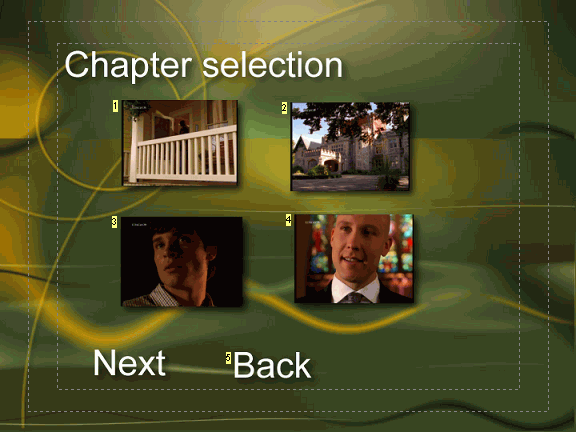 As
previously explained, you can add thumbnails from the actual movie using the
thumbnails button (that's the lowermost button to the left of a menu page) and
selecting the appropriate chapter. Then you link the thumbnails to the appropriate
chapters as you'd link any other button.
As
previously explained, you can add thumbnails from the actual movie using the
thumbnails button (that's the lowermost button to the left of a menu page) and
selecting the appropriate chapter. Then you link the thumbnails to the appropriate
chapters as you'd link any other button.
A note on that: Doing it that way will make the entire thumbnail a button. If you'd prefer to have a border around the thumbnail, which constitutes the button (so the area around a thumbnail would be selected rather than the image itself), you should create a non filled rectangle and use it as button.
Okay, so far we have a standard non animated menu. Now this is where the magic begins. From the wizard menu select Render Motion Menu...
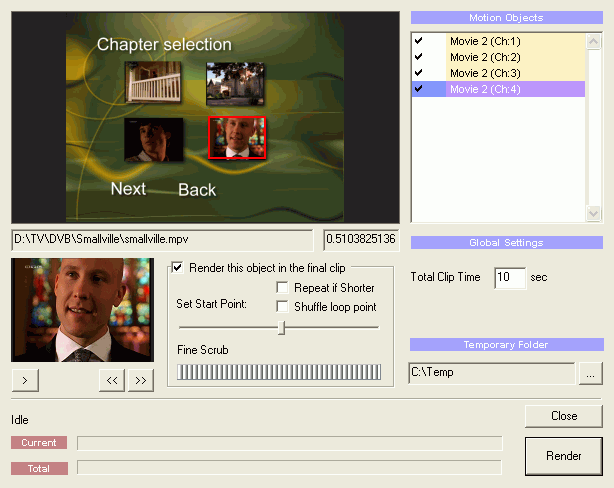 In
this screen, you once again see a preview of what you're getting. Motion
Objects are all items that can be animated. In our case, we have 4 movie
thumbnails representing the first frame of a chapter.
In
this screen, you once again see a preview of what you're getting. Motion
Objects are all items that can be animated. In our case, we have 4 movie
thumbnails representing the first frame of a chapter.
In Global Settings you can indicate how long the menu animation lasts. As it is configured now, the menu will loop after 10 seconds.
If you were to uncheck Render this object in the final clip, then the currently selected object (also shown with a red border in the preview area), would not be animated.
Using the slider and the fine scrub area, you can fine-tune the start position of the animation. Repeat if Shorter would be useful if not all Motion Objects have the same playlength. Those with a shorter length would then be looped before the entire menu loops. Shuffle loop point means that not every item would loop at the same time.
Once you're done configuring, make sure there's enough space in the Temporary Folder, then press Render.
DVD-lab will now export the motion menu as an AVI file, that you have to encode
to a DVD compliant MPEG-2 file before you import the encoded motion menu.
After importing, drag and drop the asset to the appropriate menu page. The following
warning will appear.

There is an alternative to creating motion menus. If you can live with one of the chapter selection templates DVD-lab offers, you can use DVD-lab's automatic chapter menu selection feature. To access it, press the wizard button and select Add Scene Selection menus...
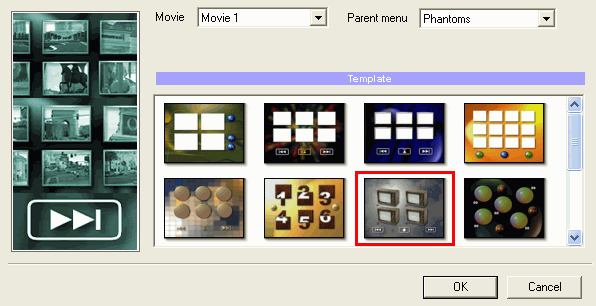 Here
you have to select for which movie (Movie) you want to generate a chapter
selection menu, and you also have to indicate which menu links to this chapter
selection menu (Parent menu). Then select a template and press OK to
get started.
Here
you have to select for which movie (Movie) you want to generate a chapter
selection menu, and you also have to indicate which menu links to this chapter
selection menu (Parent menu). Then select a template and press OK to
get started.
This will insert the appropriate menus, but you'll still have to go through the Render Motion Menu wizard and encode the menus.
Now we're basically done, but before we compile our project, let's review:
We
have a main menu linking to the two movie menu via a transition video. Each
movie menu links to the first chapter of the movie, back to the main menu, and
to a chapter selection menu. This in turn links to the appropriate chapters
in the movie, back to the movie menu, and it's an animated looping menu.
The configuration for the 2nd movie would be the same.
Now it's time to compile the project so press the Compile button.
![]()
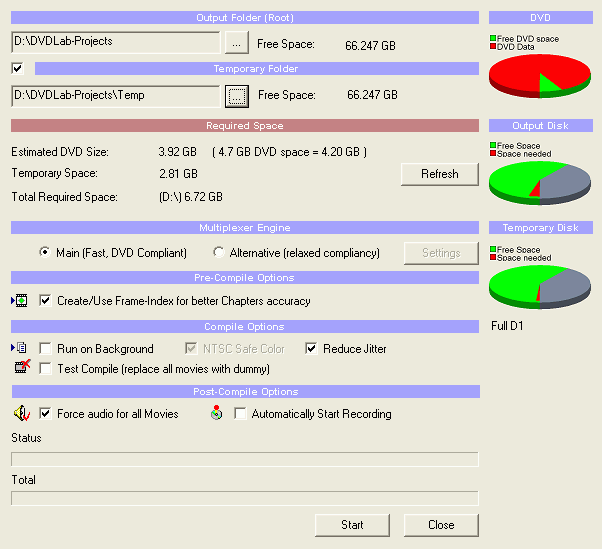 In
the compilation window, configure the Output Folder and Temporary
Folder (if you can put them on two different harddisks, it will greatly
speed up the process).
In
the compilation window, configure the Output Folder and Temporary
Folder (if you can put them on two different harddisks, it will greatly
speed up the process).
When using DVB content, you might have to select the Alternative Multiplexer Engine, but try the Main engine first. The alternative engine is less sensitive to possible problems in the MPEG-2 stream and accepts streams that are not 100% specs compliant (but then don't expect every player to handle such streams perfectly).
If you have not created a frame index before, Create/Use Frame-Index for better Chapter accuracy should be checked now.
If you want to continue working on the project during compilation, or start working on a new project, select Run on Background. If you check Test Compile, a project with dummy video data will be created. This allows you to quickly get a project for testing the menu navigation and features. If you check Automatically Start Recording, DVD-lab will write the output to a DVD after compilation. I suggest that you first check the compiled output in a software DVD player before burning.
Once compilation is over and you have checked out the project, you can burn
the project.
![]()
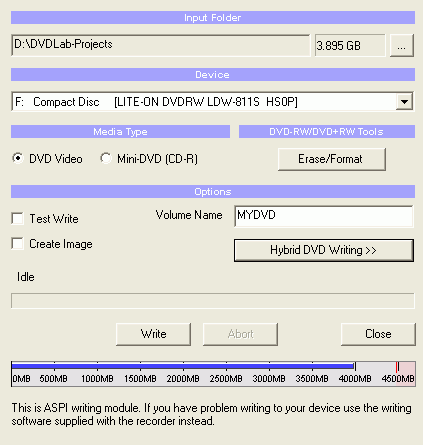 Select
your burner (Device) if you have multiple burners. In the Options,
you can also select a name for the disc.
Select
your burner (Device) if you have multiple burners. In the Options,
you can also select a name for the disc.
If you press on Hybrid DVD Writing, you can add data files to your project.
Press Write to start burning.