 The
first thing you want to do is give the profile a name that easily allows you
to identify it.
The
first thing you want to do is give the profile a name that easily allows you
to identify it.The RoBa method for CCE encoding
In case you're unfamiliar with the terminology check out the original post in my forum which lead to this method.
Then start up CCE SP. The first thing we want to do is select a template. Templates allow us to set certain options which will then be applied to every file we import into CCE. This spares us from manually configuring a possibly large number of encoding tasks. Just select Template from the main menu and click on the standard template.
This will open a new window where you can create, change and delete templates.
The
first thing you want to do is give the profile a name that easily allows you
to identify it.
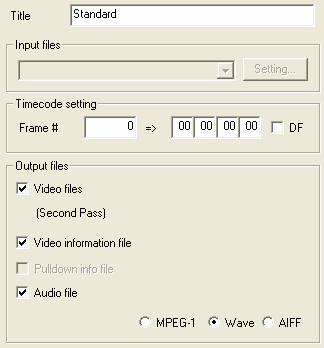
Then you'll want to uncheck Audio file: which is absolutely useless for our process and make sure the Timecode settings are set so that frame 0 will get timecode 00:00:00:00
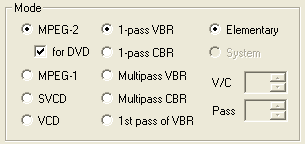
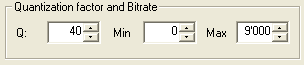
Now let's get into the thick of it. We first perform one pass VBR pass over the video, with a Q factor of 40, a minimum bitrate of 0 and a maximum bitrate of 9800:
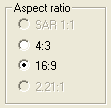
Also set the Aspect ratio:
 I
have a profile for both aspect ratios and depending on what assets I'm encoding
I'm just switching between the two. Before: the active profile determines all
settings a newly imported video source will be given, so change to a 16:9 profile
before importing 16:9 assets.
I
have a profile for both aspect ratios and depending on what assets I'm encoding
I'm just switching between the two. Before: the active profile determines all
settings a newly imported video source will be given, so change to a 16:9 profile
before importing 16:9 assets.
Then let's configure the advanced video settings:
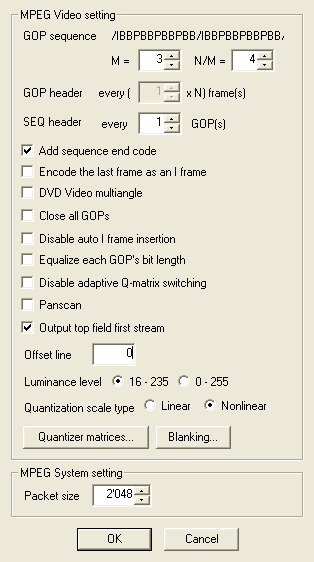 Here
we configure a lot of important options.
Here
we configure a lot of important options.
Set GOP sequence to M = 3 and N/M = 4, check Add sequence end code and Output top field first and set the Offset line to 0.
Set the Quantization scale type to Nonlinear if it's not already set and leave Luminance level at the default of 16 to 235.
Then press OK to get back to the main configuration screen.
Press Picture Quality to configure additional parameters:
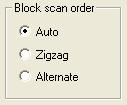 Set
the Block scan order to Zigzag, and check the Progressive frame
flag.
Set
the Block scan order to Zigzag, and check the Progressive frame
flag.
Then uncheck all filters and set Quantizer characteristics to 15. Finally,
press OK to get back to the main configuration window and press Save...
to add the profile. You can now select it from the template list:
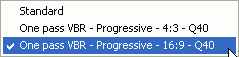
As you can see I have already created a 2nd profile for 16:9 assets.
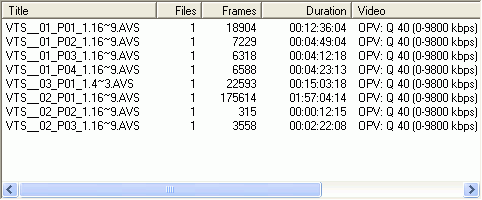
After selecting the proper template you can start adding files to be encoded. You do that by right clicking in the main CCE area and selecting add. CCE will per default not list .AVS files so you'll have to change Files of Type to All Files. If you're using DIF4U the AviSynth script files will have the aspect ratio in their name. As an example VTS__02_P03_1.16~9.AVS would have to be encoded in 16:9, VTS__03_P01_1.4~3.AVS in 4:3.
Before you start encoding there's one more detail to take care of. In order to have perfectly accurate chapter positions we need to make sure each chapter starts with an I-frame (that is a complete but compressed frame). We do that by setting chapter points in CCE. It's possible to do it within CCE there's a much easier way. Select File - Save as in CCE and save your current project. This will create an .ECL file containing all your settings. Then you can open that file using a simple text editor like notepad. Once opened you'll see something like this:
[file]
name=D:\SWORDFISH\VIDEO_TS\swordfish.avs
type=0
frame_first=0
frame_last=142829
encode_first=0
encode_last=142829
Now start up IfoUpdate, select the IFO file of the VTS set you're currently processing in the Original IFO path line (don't worry about Authored IFO path and Backup IFO path for now), and select File - Save Chapter Files (.chp) from the menu. You'll get to a screen looking like this:
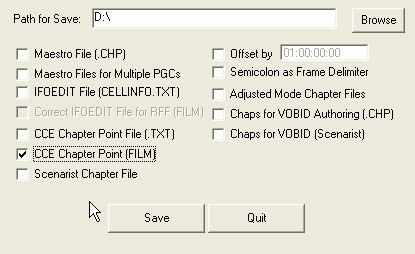 First
select a path for your chapter files.
First
select a path for your chapter files.
Then check CCE Chapter Point (FILM) and press the Save button. This will create one text file for each PGC the currently selected VTS set has. VTS_01_0.IFO returned the following 4 files:
PGC01-CCE-FILM.TXT
PGC02-CCE-FILM.TXT
PGC03-CCE-FILM.TXT
PGC03-CCE-FILM.TXT
Copy all those files to the folder of your VTS1 video, audio and subtitle files.
Then repeat this process for every VTS set.
In case you're re-authoring by VOB ID you will also have to check Chaps for VOBID (Scenarist). This will create an additional 3 files, of which VOBID-ALL-CCE-FILM.TXT will be useful to you as it contains the chapter points for CCE.
Once you're done close IfoUpdate again.
Now you have to open your .ECL file using a text editor like notepad and locate the first section which looks approximately like this:
[file]
name=D:\TRAINING_DAY\VTS1\VTS__01_P01_1.16~9.AVS
type=0
frame_first=0
frame_last=18904
encode_first=0
encode_last=18904
As you can see from the name this is VTS1 PGC1. Now locate PGC01-CCE-FILM.TXT in your VTS1 folder and open it with a text editor as well. Then copy and paste the content of PGC01-CCE-FILM.TXT below the encode_last=18904 line in the ecl. If there's just one line in the text file IfoUpdate has created there's no need to copy it. In fact, many extras do not have chapters which makes your job a lot easier. In case you're re-authoring by VOB ID you can take the chapter position relative to a VOB ID in the VOBID-ALL-CCE-FILM.TXT file.
Repeat this process for every file you're encoding, that is add the chapter positions to each file you're encoding. A [file] section followed by name= will help you identify the next movie file in the ecl. In the end an .Ecl section for one PGC might look like this (I took this example from another movie):
[file]
name=D:\SWORDFISH\VIDEO_TS\swordfish.avs
type=0
frame_first=0
frame_last=142829
encode_first=0
encode_last=142829
chapter=0:
chapter=5860:
chapter=11877:
chapter=16979:
chapter=21775:
Also add the following line to the [item] section of each file you're encoding:
vbr_bias=30
Where you replace the value of 30 according to your bitrate. The higher your bitrate the higher this factor. For a bitrate of 4000kbit/s you'd use a bias of 40, for a bitrate of 3000kbit/s you'd use a bias of 30, etc. Trilight has compiled a nice page outlining how the bias can be chosen.
Once you're done save the .Ecl again, start up CCE, select File - Open and
pick your .Ecl file. The CCE window will then look like this:
 Once
you've added all your video files press encode to get started. You are not required
to save the project file when being asked to.
Once
you've added all your video files press encode to get started. You are not required
to save the project file when being asked to.
Once encoding is done let's prepare for the 2nd pass. I once again suggest that
you create an appropriate profile for this situation. In fact you can use the
old profiles and just edit them a bit.
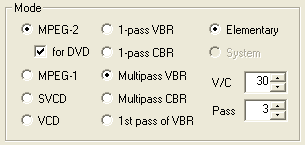 One
thing that has to be changed is the Mode. Set it to Multipass VBR.
One
thing that has to be changed is the Mode. Set it to Multipass VBR.
Further down you can now configure the bitrate:
 Set
the average bitrate to your desired bitrate. For extras I suggest a bitrate
of 1800 - 2000 kbit/s along with 3 passes or more.
Set
the average bitrate to your desired bitrate. For extras I suggest a bitrate
of 1800 - 2000 kbit/s along with 3 passes or more.
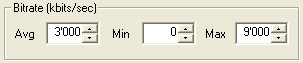
The minimum bitrate should be 0, the maximum bitrate can be calculated as follows: 9800 - total audio bitrate. As an example if you have 1 2.0 kbit/s AC3 track (192kbit/s), 2 5.1 kbit/s AC3 tracks (384kbit/s each) you'd get to a max bitrate of 9800 - 192 - 2*384 = 8840 kbit/s. If you're wondering what bitrate a certain audio track has you can use a software DVD player.
An example using PowerDVD XP: Start up the application, press the open button
and select Media Files, select your AC3 and press OK. Now right click in the
video area, select properties, click on the configuration tab and you'll see
something like this:
Normally you'd want to encode the extras first, author them and then calculate the bitrate of the main movie in order to use the DVD to its full capacity. Thus, after creating profiles for the 2nd pass you'll start adding videos to CCE again. Once done press OK twice to get back to the main screen and repeat this procedure for every file you're going to encode then press the Encode button to get started.
>> BACK
This document was last updated on August 9, 2005