 Copy
DVD Titles allows you to back up a part of a DVD.
Copy
DVD Titles allows you to back up a part of a DVD.CloneDVD guide
CloneDVD is elby's (elby is the creator of the infamous CloneCD CD backup program which was recently sold to an offshore company due to the Euro DMCA abolishing fair use rights throughout Europe) version of a beginner friendly DVD backup tool. It contains everything you need to back up a DVD to a DVD±R disc but can only handle non encrypted discs.
You will need the following software for this guide:
DVD Decrypter
or an on-the-fly decryption driver like AnyDVD
or DVD Region-Free
CloneDVD
ImgTool &
DVD Decrypter
or a commercial DVD burning program (if you prefer not to burn using CloneDVD)
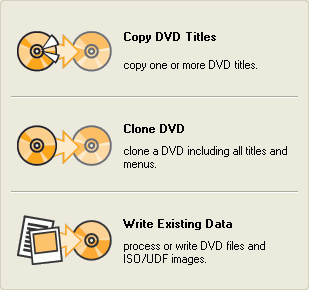
Once you've started up CloneDVD, you'll have three options:
Copy
DVD Titles allows you to back up a part of a DVD.
Clone DVD creates a copy of an entire DVD and Write Existing Data allows you to write a DVD disc image or a VIDEO_TS folder containing a DVD movie.
Note that Clone DVD can be used to create only a partial backup as in Copy DVD Titles so the two options are in fact pretty much the same.
I'll guide you through creating a full DVD backup and explain how to get rid
of certain extras in the process. Press Clone DVD to get started.
The first thing you'll have to do is select a suitable DVD source. CloneDVD supports non-encrypted files only, so if you're not using an on-the-fly decryption tool like AnyDVD or DVD Region-free, you'll have to rip your DVD using DVD Decrypter first. CloneDVD will automatically scan your system for suitable sources, and list them in the dropdown list.
![]()
You'll then be taken to the next window called Title configuration.
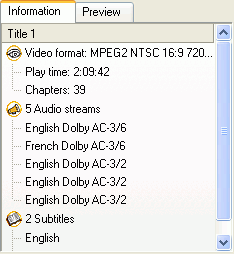 On
the left side, information to the currently selected title on the right side
is shown. As you can see, we have information regarding the video format, the
length, number of chapters, and audio and subtitle streams.
On
the left side, information to the currently selected title on the right side
is shown. As you can see, we have information regarding the video format, the
length, number of chapters, and audio and subtitle streams.
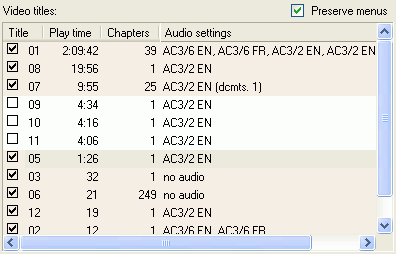 On
the right side we have all available video titles. A video title is one video
item available on the DVD. Because you normally don't know which title contains
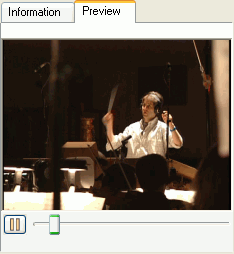
which video, you can click on the Preview tab to the left, which will yield
a preview window. Now just select the title you are interested in on the right,
and press the play button to start the preview.
On
the right side we have all available video titles. A video title is one video
item available on the DVD. Because you normally don't know which title contains
which video, you can click on the Preview tab to the left, which will yield
a preview window. Now just select the title you are interested in on the right,
and press the play button to start the preview.
As I have mentioned, the Clone DVD mode can also be used to create a partial disc backup. By default, every title is selected. However, if you prefer to not include a certain title in the final output, just uncheck it in the list of titles. If you don't want the menus, you can also uncheck Preserve Menus. Once you've unchecked all titles you don't want, press Next.
The next window is once again divided into two parts. On the left side we have stream information for each title. Length of each title, and the audio and subtitle streams contained in the title is shown.
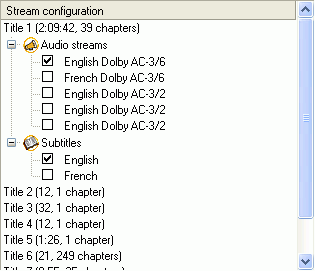
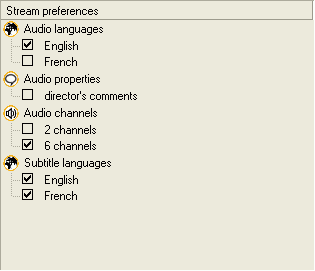
On the right side we have global stream preferences for your project.
 In
order to get better video quality, you should remove all audio and subtitle
streams you don't need in your project. Use the stream preferences to set global
preferences for your project.
In
order to get better video quality, you should remove all audio and subtitle
streams you don't need in your project. Use the stream preferences to set global
preferences for your project.
I've set up my project to only contain English 6 channel audio tracks, and English and French subtitles.
The selections you make in Stream preferences apply to the entire project. If you want to configure titles manually, you can do so using the Stream configuration on the left side. Just select a title, and check or uncheck streams you want to include / exclude.
Note that selecting 6 channels only will result in most extras having no audio (because extras usually have 2 channel audio only), so make sure you verify that your extras have audio before you proceed.
Pressing Next will bring you to the output configuration. On the left side of the screen, the properties of your project are shown. On the right side you can configure the output.
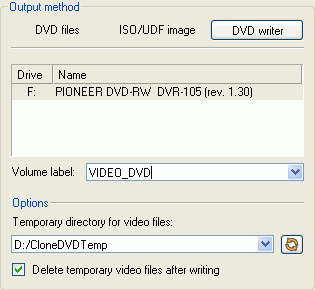 There
are three output methods: DVD files returns a VIDEO_TS folder containing VOB,
BUP and IFO files that can be burned using any DVD burning capable software.
ISO/UDF image returns an image file that can be burned using any tool that's
capable of burning ISO images. Selecting DVD writer allows you to directly burn
your output after encoding.
There
are three output methods: DVD files returns a VIDEO_TS folder containing VOB,
BUP and IFO files that can be burned using any DVD burning capable software.
ISO/UDF image returns an image file that can be burned using any tool that's
capable of burning ISO images. Selecting DVD writer allows you to directly burn
your output after encoding.
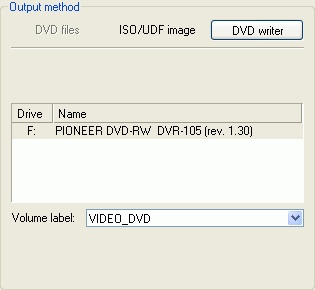
If you select DVD writer, you also have to select your DVD burner and provide a name for the disc (Volume label). Last but not least you must select a path where the encoded files are stored prior to burning. Make sure that the drive the temporary folder is on has enough free space (4.34 GB is required).
If you want to burn your project again at a later point, uncheck Delete temporary video files after writing, which will preserve the files CloneDVD generates (a VIDEO_TS folder).
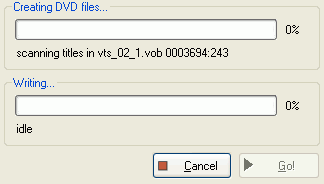
Press Go to start encoding. If you've selected DVD writer as output method,
DVD writing will commence once the movie has been encoded. The progress of both
encoding and burning is shown once the process has started.
That's it folks :)
If you have chosen not to burn the project directly, or want to burn it again at a later point, you can use the Write Existing Data option in CloneDVD.
The burning window is divided into two parts:
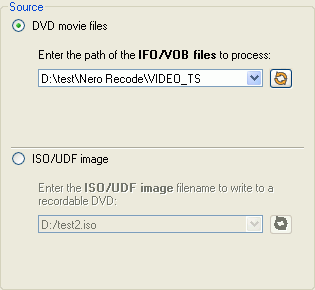 The
source part allows you to select a VIDEO_TS folder, or a DVD image.
The
source part allows you to select a VIDEO_TS folder, or a DVD image.
On the right side you select your DVD burner and provide a label for the disc
(Volume label). Then press Go! to start burning.
This document was last updated on April 12, 2009